SIZES
One size
FINISHED MEASUREMENTS
13″ from toe to heel; 16″ from top of cuff to heel; 19″ circumference at cuff; 15″ circumference at foot
YARN
Mirasol Ushya (98% Merino Wool/2% Polyamide; 114 yd/104m per 100g skein); 2 skeins
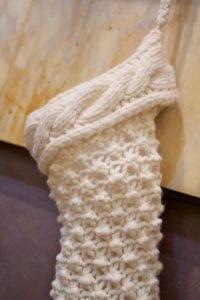
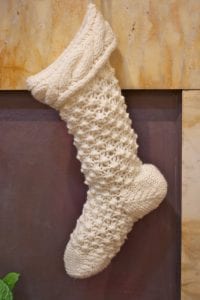
Shown in color #1700/White Clouds
NEEDLES
US 17 (12mm) set of 5 dpns, 8″ long or other preferred method to work in the round, or size needed to obtain gauge
NOTIONS
Several yds of similar weight waste yarn
Removable stitch marker
Spare circular needle, any length
Cable needle (or use of the dpns)
Tapestry needle
GAUGE
10.5 sts and 13 rnds = 4″ (10cm) in Blackberry Stitch
TECHNIQUES/ABBREVIATIONS
Provisional CO using any method with scrap yarn
3/3LT – slip next 3 sts onto CN and hold in front, k following 3 sts, then k3 from CN
CO – cast on
k – knit
k2tog – knit 2 stitches together (right-leaning decrease)
k3tog – knit 3 stitches together (right-leaning double decrease)
kwise – knitwise (as if to knit)
p – purl
p2sso – pass 2 slipped stitches over
psso – pass slipped stitch over
pwise – purlwise (as if to purl)
RS – right side
sl – slip
ssp – slip, slip, purl (right-leaning decrease)
st(s) – stitch(es)
tog – together
WS – wrong side
wyif – with yarn in front
yo (on WS) – with yarn in front, wrap it over right needle from front to back
yo (on RS) – with yarn in back, wrap it over right needle from back to front
DIRECTIONS
Using waste yarn in similar weight and your preferred method for provisional CO, CO 20 sts on one of the dpns.
TOE
Switch to work with Main Yarn, leaving tail. Secure tail and the waste yarn of the cast on.
Note: The toe is worked back and forth on two dpns.
Row 1 (WS): Knit.
Row 2 (RS): P19, turn work, yo.
Row 3: K18, turn work, yo.
Row 4: P17, turn work, yo.
Row 5: K16, turn work, yo.
Row 6: P15, turn work, yo
Row 7: K14, turn work, yo.
Row 8: P13, turn work, yo
Row 9: K12, turn work, yo.
Row 10: P11, turn work, yo.
Row 11: K10, turn work, yo.
Row 12: P9, turn work, yo.
Row 13: K8, turn work, yo.
Row 14: P8, turn work, yo.
Row 15: K8, turn work, yo.
Row 16: P8, sl next 2 yos as if to ssp, p the next st, p2sso (the yos), turn work, yo.
Row 17: K9, sl next 2 yos as if to k2tog, k the next st, p2sso, turn work, yo.
Row 18: P10, sl next 2 yos as if to ssp, p the next st, p2sso, turn work, yo.
Row 19: K11, sl next 2 yos as if to k2tog, k the next st, p2sso, turn work, yo.
Row 20: P12, sl next 2 yos as if to ssp, p the next st, p2sso, turn work, yo.
Row 21: K13, sl next 2 yos as if to k2tog, k the next st, p2sso, turn work, yo.
Row 22: P14, sl next 2 yos as if to ssp, p the next st, p2sso, turn work, yo.
Row 23: K15, sl next 2 yos as if to k2tog, k the next st, p2sso, turn work, yo.
Row 24: P16, sl next 2 yos as if to ssp, p the next st, p2sso, turn work, yo.
Row 25: K17, sl next 2 yos as if to k2tog, k the next st, p2sso, turn work, yo.
Row 26: P18, sl next 2 yos as if to ssp, p the next st, p2sso, turn work.
FOOT
Unravel provisional CO and divide the 20 sts from it between 2 dpns. Begin to work in the round. Place removable stitch marker to indicate BOR.
Setup Rnd: P 20, sl next st pwise, p next 2 sts tog, psso, p 19.
40 sts total on the needle. Divide sts among 4 dpns in the following manner: needle 1—11 sts; needle 2—9 sts; needle 3—11 sts, needle 4—9 sts.
Begin to work in Blackberry Pattern in the round, as follows.
Rnd 1: *K3tog, [p1, k1, p1 into next st]*, rep from * to end of the rnd.
Rnd 2: Purl.
Rnd 3: *[P1, k1, p1 into next st], k3tog, rep from * to end of the rnd.
Rnd 4: Purl.
Repeat Rnds 1–4 three times more.
HEEL
Work Rows 2–25 of TOE instructions.
Return to working in the round.
Rnd 1: P18, sl next 2 yos as if to ssp, p the next st, p2sso, *k3tog, [p1, k1, p1 into next st]*, rep from * 5 times.
Rnd 2: Sl next st pwise, ssp, pass slipped st over, p39.
Continue to work in Blackberry Pattern:
Rnd 1: *[P1, k1, p1 into next st], k3tog, rep from * to end of the rnd.
Rnd 2: Purl.
Rnd 3: *K3tog, [p1, k1, p1 into next st]*, rep from * to end of the rnd.
Rnd 4: Purl.
Repeat Rnds 1–4 eight times more.
Next rnd: Knit.
Then knit only 9 sts of the next row. This is middle of the back/calf where cuff attachment begins.
Cut yarn leaving 20″ tail. Transfer all live sts onto spare circular needle.
CUFF
Cuff is worked using modular technique, knitting flat back and forth and attaching last edge st of every other row directly onto the next live st of the stocking (the stitches that are being held on the spare circular needle).
Using preferred method CO 12 sts onto one of the dpns with Main Yarn.
Row 1 and all odd-numbered rows except for Cabled Rows (RS): Sl 2 kwise, p1, k6, p1, k1, sl next st kwise, with WS of stocking facing, knit 1 st from the stocking sts held on circular needle, psso.
Row 2 and all even-numbered rows (WS): Sl1 wyif pwise, p1, k1, p6, k1, p2.
Rows 5, 11, 21, 27, 37, 43, 53, 59, 69, 75 (Cabled Row): Sl 2 kwise, p1, 3/3LT, p1, k1, sl next st kwise, k the last knit st from the stocking, psso.
Work in established pattern until a total of 79 rows for Cuff have been worked and all stocking sts are joined to cuff.
Row 80 (WS): BO all sts.
Cut yarn leaving at least 25″ tail. Thread it through tapestry needle and mattress stitch the cuff ends together.
With the remaining tail ends of the yarn, crochet, knit, or braid a cord approx. 10″ long and create a loop to hang the stocking. Weave in all remaining ends.
FINISHING
Soak in warm water with a little bit of wool wash. Roll in dry towel several times to get rid of the excess moisture. Lay flat to dry; block to measurements with pins if necessary.