by Jennifer Kazanciyan
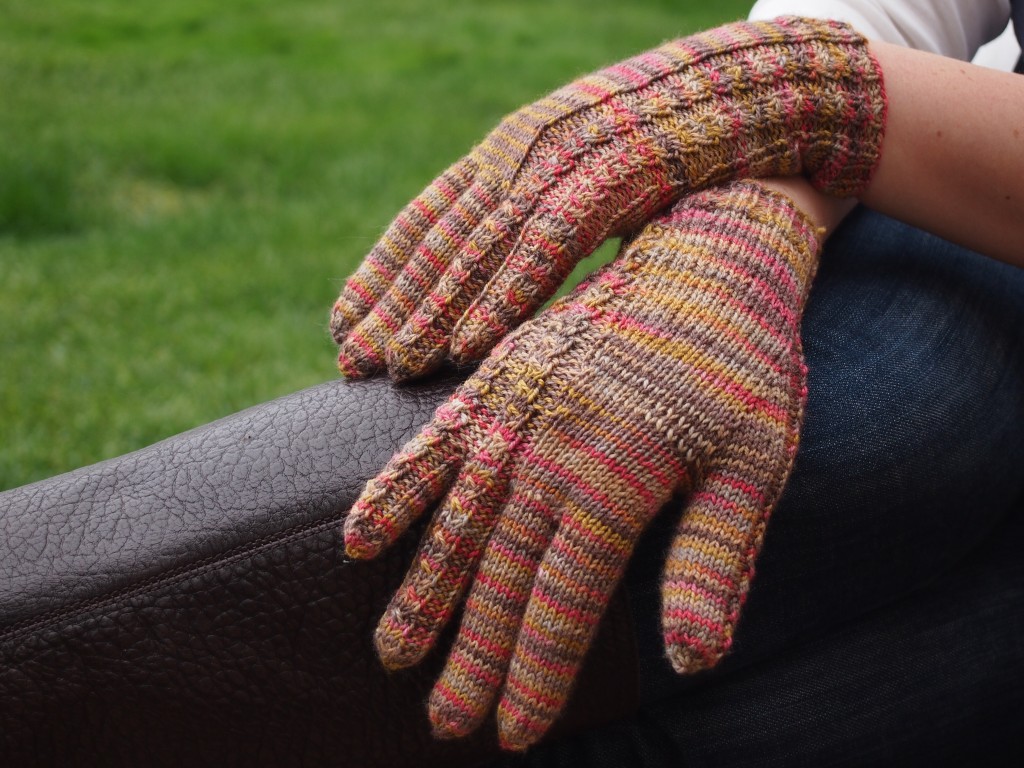
Erwarmt is a lightweight pair of gloves that provide warmth and temperature regulation. They are knit in any fingering weight yarn!
The simple, basic, plait cable gives a little bit of decoration without complicating the pattern. Cables on the pinky and ring finger take a short trip from the side of the hand to the top of the finger.
Materials
- 1 skein of Lorna’s Laces Solemate or 200 yards/50 grams of fingering weight yarn (sample shown in colorway Robot Overlord)
- U.S. Size 0/2mm Double Pointed Needles
- Cable Needle
- Stitch markers
Size
- The gloves are approximately 6.5”/17 cm around and are designed to snuggly fit a 7”/18 cm hand.
Gauge
- 28 sts and 40 rows / 4” square
 Abbreviations
- BO: Bind Off
- CO: Cast On
- k: Knit
- p: Purl
- sm: Slip marker
- st(s):stitch(es)
- k2tog: Knit two together (right leaning decrease)
- ssk: Slip slip knit (left leaning decrease)
- m1R: Increase 1 stitch by lifting the bar before the next st from back to front, knit through the front loop (right leaning increase)
- m1L: Increase 1 stitch by lifting the bar before the next st from front to back, knit through the back loop (left leaning increase)
- BOR: Beginning of the round
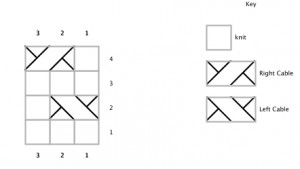
- Right Cable: slip 1 st to cable needle, hold in back, k 1 st from left needle, k 1 st from cable needle
- Left Cable: slip 1 st to cable needle, hold in front, k 1 st from left needle, k 1 st from cable needle
Instructions
Right Glove
- Cast on 51 sts. Place marker A and join to work in round.
- Set-up row: p2, work Cable Chart, p2, place marker B, *(k2, p2) repeat from * 4 times, k2, place marker B, p1, work Cable chart, p2, work Cable Chart, p2, place marker B, *(k2, p2) 3 times, k2.
- Work as established for 1”/2.5 cm
- Cuff Row: p2, work Cable Chart, p2, sm, k to marker, sm, p2, work Cable Chart, p2, work Cable Chart, p2, sm, k to end.
- Work as established for 3”/7.6 cm from cast on edge.
Body
- READ THROUGH ENTIRE BODY INSTRUCTIONS BEFORE STARTING.
- Thumb Gusset:
- M1L, p2, work Cable Chart, p2, m1R, sm, work stitches as established until end of round.
- Work 2 rows as established.
- Repeat the previous 3 rows 7 times. (21 stitches between marker A and first marker B)
- Divide the thumb gusset: Remove BOR marker. Put thumb stitches on holder, CO 2 sts, place BOR marker, CO 2 sts. Work in pattern until end of round. (48 sts)
- AT THE SAME TIME:After removing the thumb gusset and working the Cable Shift Rows, you should still have 48 stitches. Work in pattern for 1.75”/4.5 cm from thumb or desired length.
- Work 13 rows from cuff.
- Work Cable Shift Row. Cable Shift Row: Work as established until second marker B, m1R, sm, work stitches as established to next marker, sm, k2tog, work to end of round.
- Work 5 rows, then work Cable Shift Row one more time.
- Work 5 rows, then work Cable Separation Row. Cable Separation Row: Work as established until second marker B, sm, p2, work Cable Chart, p1, m1P, p1, work Cable Chart, p2, sm, k2tog, work in pattern to end of round.
- First Finger (Pointer)
- Knit 7 sts from the beginning of the round.
- Place all but the last 7 sts on waste yarn. Cast on 4 sts, knit the last 7 sts. (18 sts total)
- Place marker and join to work in the round. Work in stockinette stitch for 2.75”/7 cm or required length.
- Shape tip of finger:
- Round 1: (k1, k2tog) Repeat to end of round.
- Round 2: Knit.
- Round 3: k2tog to end.
- Break yarn, pull yarn through live stitches, and weave in end.
- Second Finger (Middle)
- Knit 6 sts off beginning of waste yarn, cast on 3 sts, knit last 6 sts from end of waste yarn, then pick up 3 sts from base of First Finger. (18 sts total)
- Place marker and join to work in the round. Work in stockinette stitch for 3”/7.6 cm or required length.
- Shape tip of finger as for First Finger.
- Third Finger (Ring)
- Knit 6 sts off beginning of waste yarn, cast on 2 sts, knit last 6 sts from end of waste yarn, then pick up 2 sts from base of Second Finger. (16 sts total)
- For this finger, check to make sure one of the cables is centered on the top of the finger.
- Pattern Row: k7, p2, work Cable Chart, p2, k to end.
- Work in pattern row for 2.3”/5.8 cm or required length.
- Shape tip of finger:
- Round 1: (k1, k2tog) Repeat to 4 sts remain. K1, k3tog.
- Round 2: Knit.
- Round 3: k2tog to end.
- Break yarn, pull yarn through live stitches, and weave in end.
- Fourth Finger (Pinky)
- Knit remaining 10 sts from the waste yarn to your needles and pick up 5 stitches from the base of the Third Finger. (15 sts total)
- Place marker and join to work in the round.
- Pattern Row: k3, p2, work Cable Chart, p2, k to end.
- Work in pattern row for 2”/5 cm or required length.
- Shape tip of finger as for the First Finger.
Thumb
- Put 21 thumb stitches onto dpns, Work in pattern, maintaining cable pattern. Pick up 1 stitch from base of thumb, pm, pick up 1 stitch from base of thumb.
- Work one round, maintaining stitches as established. (23 stitches)
- Ssk, work in pattern until 2 sts remain, k2tog. (21 stitches)
- Work stitches as established for 2”/5 cm or required length.
- Shape top of thumb as for First Finger.
Left Glove
- Cast on 51 sts. Place marker A and join to work in round.
- Set-up row: p2, work Cable Chart, p2, place marker B, *(k2, p2) repeat from * 3 times, k2, place marker B, p2, work Cable chart, p2, work Cable Chart, p2, place marker B, *(k2, p2) 4 times, k2.
- Work as established for 1”/2.5 cm.
- Cuff Row: p2, work Cable Chart, p2, sm, k to marker, sm, p2, work Cable Chart, p2, work Cable Chart, p2, sm, k to end.
- Work as established for 3”/7.6 cm from cast on edge.
Body
- READ THROUGH ENTIRE BODY INSTRUCTIONS BEFORE STARTING.
- Thumb Gusset:
- M1L, p2, work Cable Chart, p2, m1R, sm, work stitches as established until end of round.
- Work 2 rows as established.
- Repeat the previous 3 rows 7 times. (21 stitches between marker A and first marker B)
- Divide the thumb gusset: Remove BOR marker. Put thumb stitches on holder, CO 2 sts, place BOR marker, CO 2 sts. Work in pattern until end of round. (48 sts)
- AT THE SAME TIME:After removing the thumb gusset and working the Cable Shift Rows, you should still have 48 stitches. Work in pattern for 1.75”/4.5 cm from thumb or desired length.
- Work 13 rows from cuff.
- Work Cable Shift Row. Cable Shift Row: Work as established until 2 sts before second marker B, k2tog, sm, work stitches as established to next marker, sm, m1R, work to end of round.
- Work 5 rows, then work Cable Shift Row one more time.
- Work 5 rows, then work Cable Separation Row. Cable Separation Row: Work as established until 2 sts before second marker B, k2tog, sm, p2, work Cable Chart, p1, m1P, p1, work Cable Chart, p2, sm, work in pattern to end of round.
Fingers
- Follow the directions for the Right Glove, except the pattern rows for the third and fourth fingers are different.
- Third Finger Pattern Row: p2, work Cable Chart, p2, k to end.
- Fourth Finger Pattern Row: p2, work Cable Chart, p2, k to end
Thumb
- Follow the instructions for the Right Glove.
Plait Cable Chart


